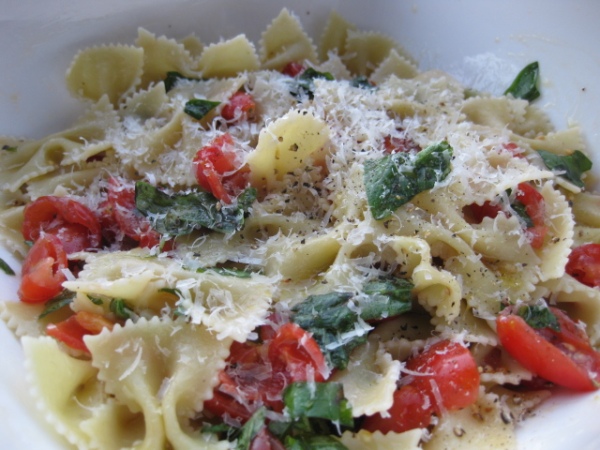
Oven Roasted Tomato & Pepper Pasta

For one reason or another, I have been on a veggie roasting spree. I came up with this recipe one afternoon, when I saw that the bowl of cherry tomatoes sitting on my kitchen counter looked like they didn’t have more than a day left in their life span, and I recalled that red pepper sitting in my fridge that could use a culinary rescue asap. Once you’ve assembled your vegetables together and placed them in the oven, you can sit back and relax- ok, or clean the house, do the laundry, bathe the children, etc- until they’re done roasting. Chop some basil, boil some water, cook your pasta, and you are good to go. During the winter months, when summer heirloom tomatoes are a distant memory, grape and cherry tomatoes tend to be sweet and ripe, which is why I tend to have them on hand to use in salads and just as snacks. This dish is quite easy on the pocket with fabulously delicious results. Then, again, it’s usually the simpler things in life that are (and taste!) better.

1 lb. (box) of pasta, whatever shape you prefer
1 pint cherry tomatoes, sliced in halves or quarters
1 pint grape tomatoes, sliced in halves
1 red pepper, seeds removed, chopped roughly
10-12 cloves garlic, peeled and left whole
medium handful of fresh thyme stalks (optional)
1 large handful of fresh basil, torn in pieces by hand
1/2 c. olive oil
1/3-1/2 c. chicken stock
2 Tbl. butter (optional)
salt, pepper to taste
Parmesan cheese, for grating

Preheat the oven to 350° F. Meanwhile, in a large roasting pan, place all your sliced tomatoes, peppers, garlic, and thyme (if using). Add the olive oil and sprinkle the vegetables with salt and pepper. With your hands, toss the vegetables, making sure everything is coated nicely with oil. Pour the chicken stock into the pan from one corner, as you just want the liquid to remain at the bottom of the pan and not remove all the spices and oil from your vegetables. Place the pan into the preheated oven and allow the vegetables to roast for about 45 minutes to one hour, or until the tomatoes and peppers’ skins are wrinkled and browned nicely, and you begin to smell that lovely roasted smell wafting from your oven. From time to time, while the veggies roast, check to see if you need to shake the pan a bit to loosen any pieces that may be sticking to the pan, or if you need to add any more oil or liquid.

While the vegetables are roasting in the oven, bring a large stock pot of salted water to a rolling boil. About 10 minutes before your veggies finish roasting, begin to cook your pasta. When the pasta is cooked al dente, drain it, making sure to reserve a bit of the cooking water (about a cup or so). Toss in everything from your roasting pan, making sure to remove any of the thyme stalks, if you chose to include this ingredient. Add the butter and torn basil. Give everything a few good stirs. Adjust the seasonings, and if you need some more liquid in the sauce, add some of the reserved pasta cooking water. This dish is fantastic on its own, but if you crave something heartier, you could always include a few meatballs on the side.

And I’m back….with $8 meals

Phew…..I’m back home from my yearly stint in Greece. My sincere apologies for not writing as much as I would have liked. Fortunately, my comrade kept things going smoothly while I was away! I hope that some of you were able to give the Greek pies and stuffed veggie recipes a try. But if not, surely there will be many more dinners to prepare in the future.

I am sure that many of you have experienced, in the last few economically trying years in America, having to pinch a penny here and there. And while this economic slump is now a global problem, we can all still do our best to eat fairly well while saving money. Of course, it’s nice to splurge from time to time and buy an expensive cut of meat or fish, but with a little know-how, it is possible to regularly make fantastic family dinners on a budget.

One key to saving money with food is to learn not only which general food products are inexpensive, but also which high-quality food products are inexpensive. Simply because an item costs more than another does not mean that it is better. For instance, usually a familiar cut of meat or fish is more expensive than another less known. But that doesn’t necessarily mean that the less known one is worse. Many fish, such as skate, are not widely popular in the United States and, therefore, not priced as highly. (And, believe me, skate is delicious!) Be adventurous, and try something new — you may just find a new love.

Yet another way to save money with food is making sure to use whatever leftover ingredients you may have remaining after you cook a dish. For instance, the following the dish calls for fresh basil. Of course, when you purchase fresh basil, it is in a rather large quantity, and since basil really does not last long unless the roots are intact, and you place the bunch into water, you may be better off making the leftover portion into some homemade pesto, which will provide you with another quick and easy supper option in the future. You most likely have the ingredients lying around your home to produce a fantastically frugal meal and not even know it. Rummage through your cabinets or pantry to find a quick and easy solution for dinner. Some rice, beans, an egg or two, and perhaps a can of coconut milk have limitless possibilities. So use your imagination and incorporate some of those leftover items lingering in your kitchen.

During my stay in Greece, I had the opportunity to visit with a lovely friend of mine, who is Italian, and learn some of her wonderful recipes. One of which, I will share with you now and fits into my $8 meal category. Of course, you may be able to make this meal for even less, but here in New York City, food isn’t cheap, so $8 seems pretty good to me. I don’t believe you can even feed a family of four at McDonald’s for that much, but since I never step foot in those types of establishments, I could be wrong.

Pasta with Fresh Tomato and Basil Dressing

Yield: 4 dinner portions

1/2-3/4 box of pasta (fusilli, gemelli, angel hair, or whatever tickles your fancy) 
1 c. olive oil
15-20 grape tomatoes, torn by hand into quarters
3 stalks worth of fresh basil leaves
2 small cloves of garlic, halved
fresh pepper, salt to taste

Pecorino cheese for grating

Place a medium-sized bowl inside a sink (believe me, the tomatoes will squirt, and by placing the bowl into the sink, clean-up will be much easier!) and tear the tomatoes into quarters with your hands. Remove the basil leaves from their stems, and either tear by hand into small pieces, or chop with a knife, and place with the torn tomatoes. Add the sliced garlic. Sprinkle with fresh pepper and some salt. Add the oil. Don’t be afraid to add what may seem like too much oil. Apparently, this is the secret to this dish, according to my Italian friend. So go ahead and add an extra glug or two! It’s healthy for you! The left-over seasoned oil is fantastic for bread dipping.

Allow the tomato mixture to sit in the oil, occasionally stirring, for about 30 minutes. Meanwhile, prepare a large stock pot with boiling, salted water. Once the water comes to a boil, add the pasta and allow to cook for approximately 8-10 minutes, depending on the shape of the pasta. (If using fresh pasta, which many grocery stores now offer, cook time will reduce significantly to about 2-3 minutes.)

Drain the pasta. Melt 1 Tbs. butter in the stock pot in which you cooked the pasta. Add the drained pasta. Remove from heat and thoroughly coat with the melted butter. Empty the pasta onto a large dish or bowl. Remove the raw pieces of garlic, if you so desire. Top the pasta with the fresh tomato basil sauce. Grate a generous portion of Pecorino cheese atop the pasta and give the dish a few good twists of fresh pepper.

A fantastically delicious, easy-on-the-pocket meal. Do you have any deliciously frugal meals on your family’s menu? We would love to hear from you. We’re gathering and testing more $8 meal recipes, and would love to post something of yours, so write us at: twodancingbuckeyes@gmail.com. Happy Eating!

TDB Homemade: Roasted Red Peppers

Roasting red bell peppers on your own is not particularly difficult.  It takes some time, but not a lot of work, and, WOW, are they delicious – way better than what you get in a jar.  A gas stove or a lit grill is a must because you need an open flame, but, otherwise, the process is easy.

Step 1:  Clean and thoroughly dry your red peppers.

Note:  this method can be used with other peppers, such as yellow and orange bell peppers, or even poblano chilis. 

Step 2:  With large tongs that can withstand high heat, hold the red pepper directly in the open flame of your stove or grill.  I find it helpful to remove the grate from the stove burner, if applicable.  Allow the flame to char, or blacken, the skin entirely and evenly — be thorough — it’ll make things easier later on.  Choosing red peppers with a smooth body and not a lot of deep crevices helps to achieve an evenly charred surface.

Note:  peppers can be placed directly under the broiler in a gas oven, if the stove top is not an option.  It takes a little longer, and the peppers don’t blacken as evenly, but some people prefer this.  Place pepper(s) on a cookie sheet as close to the flame as possible and rotate every minute or two until they are done.

Step 3:  Place charred pepper(s) in a large heatproof bowl and cover with a lid or plate.  I have a Pyrex bowl with a lid that works very well for this.  Allow them to cool and finish roasting for at least 30-40 minutes.

Step 4:  By scraping with the blunt side of a knife or with your hands, remove the charred skin from the cooled peppers.  This is a bit messy, but resist the urge to rinse the skin off the pepper with water — you’ll wash away a lot of the flavor.

Step 5:  Cut peppers open and remove the seeds and small amount of pale ribbing that remain.  Now they’re ready to eat!

Step 6:  If you don’t plan to eat them right away, cover them with olive oil and store them in a non-porous container.  They will keep in the refrigerator for 1-2 weeks.  However, in my house, they disappear within 1-2 days!  When they’re gone, be sure to retain the oil that is now infused with that wonderful roasted red pepper flavor.

Roasted Red Pepper Cooking Ideas

Roasted red peppers can be used in many ways.  Sliced or chopped, they can dress up salads and sandwiches.  Puréed, they make a great base for sauces and dips.  One of my favorite recipes is for this Roasted Red Pepper Dip by Jacques Pépin.  My version is as follows:

Roasted Red Pepper Dip / Sandwich Spread

1 roasted red pepper, cut into strips or chunks, about 3/4 cup

3-4 ounces cream cheese

2 tablespoons olive oil

2 tablespoons sesame seeds (toasting is optional and alters the flavor)

salt and pepper to taste

If toasting the sesame seeds, place them in a dry frying pan on medium heat for several minutes.  Toss them occasionally so that they don’t burn, and remove them from the heat when they turn a nice golden-brown color.

Place all the ingredients into a food processor and purée until smooth.

Serve with cut veggies, crunchy bread sticks, crackers, or on bread for a sandwich.

Roasted Red Pepper Pasta Sauce

2 roasted red peppers, chopped, about 1 1/2 cups

2-3 cloves garlic, chopped

1/4 cup fresh basil, chopped, plus more for garnish

2 cups chopped tomatoes with the juices, or one 15-ounce can

1/3 cup half and half

1/3 cup Pecorino Romano cheese, grated

salt and pepper to taste

In a medium sauce pan or straight-sided frying pan, sautée the red peppers and garlic with a sprinkling of salt and pepper over medium heat for about 4 minutes.  Add the basil and sautée for one more minute.  Stir in the tomatoes and another pinch of salt and heat to a slow simmer.  Cover and cook for about 15 minutes, until the tomatoes have cooked, and the sauce has darkened.  If the sauce seems watery, remove the lid and allow some of the liquid to evaporate.  Add the half and half and the Pecorino Romano cheese and return to a simmer for one minute.  For a smooth texture, purée the sauce with a wand blender, or carefully transfer it to a standing blender.

Serve over pasta, ravioli, or gnocchi and top with freshly chopped basil.

Spring Fever: a quick recipe to maximize your outdoor enjoyment!

It’s that time of year again, when (finally!) the trees have blossomed, the sun shines, I no longer have to wear a down winter coat, and all I want is to be outside. I extend the afternoon at the playground as late as possible before I drag my feet to go home, start the baths, and begin dinner. I yearn for dining on the sidewalk, alfresco style. Of course, I usually regret making the decision to go out for dinner as soon as the water starts to slop all over the table, while small hands grab for ice cubes; crayons roll along the floor, landing under a neighboring table; and I have to scarf down my entire entrée in about 4 minutes flat, after the kids have been fed and before the check lands on our table. Hahaha! Yes, I do longingly admire neighboring tables, where couples leisurely sip at glasses of white wine and take their good old time to enjoy their food. Then, again, there’s nothing better than a sloppy kiss of marinara sauce from my two-year-old!

All right, I got a little off track there…… I was trying to admit that when spring fever hits, I want some dinner options at my fingertips that don’t require a good deal of time to prepare. I want to stay outside in the park for an extra hour, come home, quickly chop some produce, throw it all together, and have it on the table in about 30 minutes flat.

The following recipe is one I threw together in my head while walking home from the playground. And it definitely fits under the “spring fever” recipe category. I used turkey sausage, but if you don’t have it readily available to you, feel free to substitute pork or beef sausage. If you happen to live in the New York area, there’s a a lovely company, DiPaolo Turkey Farms from Hamilton, New Jersery, which sells really delicious sweet and spicy sausage. My favorite is the bag of sweet turkey sausage. And since turkey sausage has less fat than its pork counterpart, it gives whatever dish it’s incorporated into a slightly lighter feel.

Yield: 6 main course portions

1/2 box of pasta (farfalle, campanelle, fusilli, or gemelli all work nicely)
12 c. water (more or less depending on the size of your stock pot)
3 Tbl. olive oil
1/2 bag organic, frozen spinach, thawed
1/2 lg. yellow onion, finely chopped
3 cloves garlic, finely sliced
1 lb. ground turkey sausage
2 Tbl. butter
1/4 c. grated Parmesan cheese
salt, pepper, to taste
lg. handful of chopped parsley

In a large, covered stockpot, bring the water to a rolling boil. Just before you are ready to add your pasta, throw in a few good shakes of salt. Add pasta and cook according to package directions. Make sure not to overcook the pasta. You want it to be al dente, meaning that the pasta still has a slight bit of firmness when you bite into it. Meanwhile, in a large frying pan, heat the olive oil on medium heat and add the onion and garlic. After just about a minute, add your sausage. While the sausage begins to cook, break it into smaller pieces with a large spoon. Give the pan some good twists of pepper and some dashes of salt. Add the thawed spinach (you could use fresh spinach, but the frozen variety takes less time to cook, allowing you more outdoor time!), give the dish a nice stir, cover, and allow ingredients to cook until your pasta is done cooking.

Once the pasta is cooked, drain it from the water, being sure to reserve about 1/2 c. of pasta water. Add the pasta and reserved cooking liquid to the turkey and spinach. Stir in the butter, Parmesan, and chopped parsley. Adjust seasonings to your liking. Plate the pasta and sprinkle any additional cheese, parsley, and / or pepper you may desire.

And there you have it — dinner done quickly. Toss up a quick salad of chopped cucumbers, Kalamata olives, red peppers, and some feta cheese, and you are good to go. (And perhaps even squeeze in another post-dinner walk!)

Pasta with Red Wine and Mushroom Sauce

This is a recipe concocted by my husband (who is an amazing cook, by the way), and if you love mushrooms, you have to try it!  It’s quick, easy, cheap, and delicious, so if you aspire to be more handy in the kitchen, this is a good dinner recipe to help you cultivate your interest in cooking.  It can be served as an entrée or a side dish, and it pairs well with just about anything, including the rest of the bottle of red wine!

Makes two large or four small servings.

8 ounces of shiitake mushrooms (or some other kind of meaty mushrooms, such as white button, cremini, or portobello, which, by the way, are all variations of the same kind that are aged differently)

2 cloves garlic, finely chopped

4-5 tablespoons of cold butter, separated

olive oil (butter can be substituted)

8 ounces of your choice of pasta (farfalle, linguine, and campanelle are my favorites for this dish)

3 tablespoons of tomato paste

3/4 cup red wine

salt

1/2 – 1 cup of reserved pasta water

fresh parsley and Parmigiano Reggiano for garnish

Cut or quarter your mushrooms into chunks no less than 1/2 of an inch in size.  Meanwhile, heat a large pot of water to a boil and cook the pasta according to the packaging directions.  Begin to make the sauce when you drop the pasta in the boiling water by placing a large sauté pan over high heat.  Coat the pan with about one tablespoon of butter (or olive oil), and when it’s good and hot, add your mushrooms and sprinkle with about 1/2 teaspoon of salt.  The high heat will allow the mushrooms to cook quickly so that the moisture they release is instantly evaporated, and they stay in a more substantial form, rather than become too soft.  After the mushrooms have released most of their moisture (about 4-5 minutes), turn the heat down to medium-low and add the garlic.  Add a little extra oil, if needed, so that the garlic doesn’t burn, and cook for 2 minutes.  Push the mushrooms and garlic off to the side and add the tomato paste, stirring it for about 20-30 seconds – you want it to slightly cook, but not burn.  Next, mix together the mushrooms and the tomato paste, then stir in the red wine.  After the alcohol has evaporated and the liquid has reduced by at least one-half, turn the heat to low.  Add four tablespoons of cold butter in small amounts, one pat at a time, and simply swirl the pan to combine.  After the butter has melted, add about 1/2 cup of the pasta water to the sauce to thin it out, and remove it from the heat.  Toss the sauce with the pasta, adding more pasta water, if needed, so that the pasta is coated, but not dry.  Salt to taste.  Garnish with chopped parsley and freshly-grated Parmigiano Reggiano.

Since this dish isn’t particularly dense when it comes to nutrition, round out your meal with a large, tasty Mediterranean salad, with green leaf lettuce, Kalamata olives, scallions, chopped red peppers, tomatoes, feta, and a balsamic vinaigrette.  Oh, and don’t forget to pour yourself a large glass of that delicious red wine!

Stuffed Shells (with tofu and veggies)

Like any good Italian-American family, mine loves pasta.  It’s so satisfying and versatile….perfect to match with whatever items I have hanging around in the fridge.  I also love dishes that I can make ahead of time and store in the freezer to pull out on a busy evening when there’s no time to put dinner together from scratch.  The perfect marriage of these is my recipe for Stuffed Shells.

By using tofu to replace some of the cheese in this recipe, I am able to lower the fat content and offer an additional source of nutrients, which makes this a very nice option for those of us who are, or love, a vegetarian.  But first, a disclaimer:  tofu quality varies greatly, and a fair amount of controversy surrounds the consumption of this coagulated soy product and, in fact, soy products altogether.  First, soy is a highly genetically-modified crop in the U.S., so it’s very important when buying tofu to buy Organic.  Next, soy and tofu have been touted for many benefits, but there are just as many warnings that it may actually have an unhealthy effect on the body.  If you decide that you want to consume soy in moderation, then follow the recipe below as stated.  If you would prefer a soy-free version, then replace the soy with more ricotta or cottage cheese.

Now, a little advice on buying tofu — be sure to get the “fresh” variety and eat it fresh, as well.  Tofu is often packaged with what seems to be a pretty long shelf life (at times I’ve seen months, not weeks, before the product officially expires), but you should try to eat it as soon after you buy it as possible.  For this recipe, I recommend buying tofu that is labeled as “firm”.  This means that some of the moisture has already been removed from the cube of tofu, although you will still need to squeeze out additional moisture.  Since the flavor of the tofu itself if pretty bland, feel free to go a little crazy with the herbs and veggies, and slightly more salt may be needed.

By the way, this dish has been served to several Italian food “experts” in my family who didn’t know ahead of time that tofu was nearly 50% of the filling.  So far, I’ve had no one who has felt that anything was awry in this recipe.  In fact, everyone usually loves this dish!

Ingredients:

1 16-ounce package of jumbo pasta shells

1 15-ounce package of firm tofu

1 cup ricotta cheese

1 cup shredded mozzarella cheese

1/2 cup freshly grated parmigiano reggiano

1 egg

salt and pepper

Season to your liking with dried basil, parsley, and/or oregano.  I recommend about 1 teaspoon of each.

Prepared with about 3 cups of your choice of tomato sauce and an additional cup of mozzarella cheese.

Optional vegetables to add:

1/2 medium onion, finely chopped

1-2 cloves of garlic, minced

1/2 red pepper (fresh or roasted), finely chopped

6 ounces of frozen chopped spinach, thawed and thoroughly drained

Directions:

Boil the pasta shells in salted water until they are slightly under-cooked.  Gently remove them from the water and place them on a large baking sheet that has been very lightly oiled.  Carefully separate the shells that have nested together and allow them to cool.  Meanwhile, remove the tofu from its container, drain it, and compress it gently to remove any excess liquid.  Crumble the tofu into a large bowl and add the ricotta, parmigiano reggiano, and one cup of the mozzarella.  Stir to combine.  Add the herbs and vegetables of your choosing and salt and pepper to taste.  Note:  I usually like to add a vegetable combination of onion, garlic, and either red pepper or spinach, depending on what I have in my house at the time.  Chopped spinach may be added directly to the cheese mixture without any pre-cooking.  You have a couple options for the other veggies.  You can simply chop them, or chop and pre-sauté them, but my preferred method is to pulse them together for a few seconds in the food processor so that they blend smoothly into the cheese mixture without any pre-cooking.  Lightly beat the egg and stir it into the ingredients until everything is well-combined.

Using a tablespoon (the eating kind, not the measuring kind), gently fill each shell with the mixture and return the filled pasta to the baking sheet.

If preparing for that day’s meal:

Select a baking dish that will snugly hold the amount of shells you intend to cook.  Coat the bottom with a few spoonfuls of sauce.  Carefully place the shells in a single layer in the dish, open side up.  Spoon the sauce over the shells, making sure to coat, but not drown, each one.  Sprinkle the remaining mozzarella over the top.  Bake at 350° for about 30 minutes, or until the cheese on top is melted and starting to brown.  Chopped fresh basil or parsley may be sprinkled on top before serving.

If freezing for a later use:

Place the baking sheet of filled shells in the freezer, uncovered.  Allow to freeze for at least two hours, then the shells may be stored in an airtight container.  When you are ready to use them, pull out just as many as you need and follow the cooking instructions above.  No thawing is necessary, but the cooking time may need to be adjusted.

Buon appetito!

UFO Ostrich Pasta

A couple of months ago, I decided to finally stop at the ostrich meat stand at my local farmer’s market. I had passed by on numerous occasions, staring with amazement at the enormous off-white ostrich and speckled blue-green emu eggs adorning the stand’s table, thinking to myself that I would try the meat “next week.” So there I was, asking the ostrich farmer all about the ostrich. I learned a lot about ostrich meat that morning. In fact, I can’t recall all the interesting facts that gentleman explained to me about his animals, with heated passion. But, I did come away with the knowledge that ostrich meat is an anomaly, being the only “white” red meat. It looks like ground beef in color, but it cooks like poultry, which it is.

You don’t have to spend as much time cooking the meat as you would ground beef. For instance, if you’re making a pasta sauce with meat, you allow the base of the sauce to cook its normal amount of time,  adding the ostrich meat in at the very end, and allowing it to cook for about 8-10 minutes only. Ostrich meat is a lovely alternative for those people who, for whatever reason, have sworn off red meat. It even contains less fat and cholesterol than chicken, and honestly, it imitates the taste of beef pretty well. Now for the cool factor, at least in my house: “What are we having for dinner, mom?”….. “Ostrich?!?”…..”Cool!” My son loves to learn about the food he’s about to consume, and when it happens to be something he’s not too familiar with, it provides us an opportunity to explain more about a certain animal or vegetable, which can lead to interesting dinner table conversations, to say the least!

The title of this recipe is obviously geared more towards children, but the ostrich sauce works well on any shaped pasta, not just orecchiette (aka: UFO). Of course you could tweak the spices, herbs, vegetables, and meat in the sauce to your liking. Experiment away!

For the sauce:
1/2 onion, chopped
2 cloves garlic, thinly sliced
1 lg. carrot, peeled and chopped into small pieces
1 28 oz. can ground tomatoes
1 lb. ostrich meat
2 sprigs rosemary, leaves removed from stalk and finely chopped
2 bay leaves
small handful whole allspice berries (about 6)
1 whole cinnamon stick
salt and pepper to taste
1/3 olive oil, for sautéing
1/3-1/2 c. water
salt, pepper to taste

1/2 box Orecchiette “small ears” pasta

In a large sauté pan on medium-high heat, add the oil, onion, garlic, and carrot. Allow to cook until softened, about 5-6 minutes. Lightly salt and pepper the vegetables, stirring occasionally. Add the tomatoes, rosemary, bay leaves, cinnamon stick, and allspice berries. Add some water to thin the tomatoes out a bit. (But don’t drown the sauce!) Give it a good stirring, then lower the heat to the lowest setting possible; cover pan and allow to cook slowly for about 30-45 minutes. Once sauce has finished cooking, add the ostrich meat and cook for about 8-10 minutes. **If you are using another type of meat, such as beef, it should be added after the onion and garlic and cooked the entire time with the sauce.**

Meanwhile, bring a large stock pot, filled with water, to a rolling boil. Add 1 large spoon of coarse salt along with your pasta. Allow the pasta to cook according to package instructions. Drain and add 1-2 Tbl. butter to the cooked pasta; reserve. Remove the cinnamon stick, bay leaves, and allspice berries from the sauce. If you wish, add the pasta to the sauce pan, or, keep the pasta separated from the sauce. Serve with some freshly grated Parmesan cheese and finely chopped parsley. Now you and your crew are ready for take off……..